Friday, 9 December 2016
Group: Final Cut


Thursday, 8 December 2016
O.C-Progress Update
During this weeks lesson I have been working on the print work, with me taking up the role of working on the back of the digipak in Photoshop. I started off with the original photo, with the end product needing to be distorted. I took four different sections from the original which I would edit in a variety of ways. 4 different styles were used to edit the different sections, 1 was changed to black and white, 1 I changed the opacity and enlarged, another i changed the opacity and enlarged and the final one was changed to negative in black and white which made the end result white.

Tuesday, 6 December 2016
JB: Inspiration for Shoot 4
Since our last shoot, we believe the production has really started to come together as we took inspiration from lip syncing shots from Loyle Carners' latest release 'The Isle of Aaron', which really gave an insight into a final and decided meta narrative which related between breaking the fourth wall with realistic features mentioned by Dyer and also the unrealistic and idolistic shots where the charterer pretends the camera inst really there.
 |
| We were inspired by Loyle Carners newest single of 'The Isle of Aaron', as it presented examples of camera angles such as close ups, conveying emotion, as well as exploring techniques such as the rule of thirds where the character is placed off center. |
LH: Progress Update
Since completing our most recent rough cut where all the shots are on the timeline and in the right place, we have targeted the use of transitions aiming to make the footage flow as much as possible and work with synaesthesia with the beat of the track. Also we have looked at the printwork, setting the aim of completing this over the next couple of days, this job involves distorting the images we have to the most effective level, as well as this we have to create a new album from scratch, this means that we will have to make up a track list for the album altogether, we will have to link these to the meta-narrative of Loyle Carner to make the best digipack as possible.
Monday, 5 December 2016
O.C-Progress Update
After editing the lip syncing our timeline is now complete, as we filmed me lip syncing the whole song at various different locations we had a lot of footage to look over to decide which part would fill the gaps in our timeline in the best way. After we narrowed down which bits would work the best in the gaps in the timeline the next step was cutting them down to match the lip syncing with the music.
Using the cutting tool on Da Vinci enabled us to match the lip syncing with the visuals.

Using the cutting tool on Da Vinci enabled us to match the lip syncing with the visuals.
Group: Rough Cut 3
This is our shoot so far, Today we managed to get all shots onto the timeline and in time with the music. This means that we have done our target of completing the timeline. Over the rest of the week we will be concentrating on colour grading and transitions on Davinci Resolve in order to make our video as good as possible and adding the final finishing touches to the editing process. We will also be targeting more towards our printwork in order to be done by the end of the week. After watching back we can see that there is a clear issue with the audio of the track, the bass seems to be particularly distorted which makes it less watchable.
Friday, 2 December 2016
O.C-Progress Update
In the past week I took up the role of learning the lyrics to the Mufasa this was a task that was essential in enabling us to finishing of our timeline as clear gaps were forming. So by taking this role the gaps that were evident can start to be filled with the editing process being on going after we upload the footage we got form the shoot onto our timeline. Through the coming week I shall be playing a role in editing the lip syncing and therefore adding to the timeline.
Group-Reflection on Shoot
The shoot was more successful compared to the last lip syncing task we did, this was because we went there with clear ideas about where there were going to be gaps in our music video timeline. Also we figured from the last time we shot that the camera movement was to static and to enable us to break into top band marks for our filming that was something that needed to be adjusted. Also to break the fourth wall the performer needed to engage with the camera and through this make a direct connection with the audience this could be done through making eye-contact which makes a visual connection.
As our timeline is nearly filled we went there this time with a clear objective and specific parts we needed to film. The planning and preparation was now much more efficient as there was a clear goal and outcome that needed to be reached, this was filling the gaps in the production of the music video.
In conclusion the shoot went very well and we got the shots we needed and went for. At the Train station the only problem we incurred was the amount of people walking in and out of the station but as the train is a public service this is a problem we knew we were going to face beforehand
O.C- Lip Syncing Locations
When filming the lip syncing the external location was thought about and whether the environment was rural or an urban. To form a link between location and narrative we wanted there to be a clear justification through the places we lip synced at. In our narrative our two main locations are the graveyard which we see as a rural environment and the train station which we look at as the urban location.
So when filming the lip syncing we wanted a balance between rural and urban, so we filmed at a train station and also in a woodland area. This certified a clear link between the narrative and the locations we used for the lip syncing. This all helps remove the ambiguity of the narrative with this further helping to form it also.


So when filming the lip syncing we wanted a balance between rural and urban, so we filmed at a train station and also in a woodland area. This certified a clear link between the narrative and the locations we used for the lip syncing. This all helps remove the ambiguity of the narrative with this further helping to form it also.
Thursday, 1 December 2016
JB: Progress Update 01/12/16
I have recently begun focusing more on the editing side of the photo book part of the production. one of the main limitations we found with the original footage editted from after effects was that the smoothness of the track, even with the added 'wiggle' feature was too smooth in comparison to the rest of our footage which made it look un natural, the large frame also in my opinion made it seem a bit too perfect for something which was meant to have been filmed on a train, therefore,we began using inspector and samples of cuts like jump cuts, dips to colour and whip pans to connote the hip hop culture as well as the imperfections which would be present if we had of actually filmed on a
Wednesday, 30 November 2016
Group: Shoot Preparation
Tomorrow we plan to shoot some more lip syncing shots in order to fill our timeline. So far in our editing process we have almost completed shots for the entire length, we are just missing around 6 lip syncing shots in order to fill up a certain length of footage. Tomorrow we will us the same location we used in the lip syncing shoot prior to this, one being the urban location in the train tunnel, the other a more rural woodland area. We have decided in this shoot to bring along the track in order to gain more specific shots, for example walking through the tunnel following the rapper, this will be very effective. It shows in the video below a song brought out by our artist today, this shows how we are going closely to the meta narrative of the artist, seeing as the lip syncing shots he used are where he is following the camera and walking along breaking the fourth wall, which is something we will begin to take into account.
Once we have gained these shots we will be able to complete our main timeline and then begin editing on the grading and transitions in order to make our film as effective as possible.
Once we have gained these shots we will be able to complete our main timeline and then begin editing on the grading and transitions in order to make our film as effective as possible.
Tuesday, 29 November 2016
LH: Progress Update

JB: Progress Update 29/11/2016
In today's lesson I have continued work with the Digipak design and Advertisement design. I fiddled around with similar layer and distortion effects for the Digipak design, using 4 layer tools of different sizes and slightly different positions to create a blurry and distorted effect.


Monday, 28 November 2016
JB: Q4 – How did you use media technologies in the construction and research, planning and evaluation stages?
Q4 – How did you use media technologies in the construction
and research, planning and evaluation stages?
We used blogger.com as a collaborative e-portfolio in our
group throughout the construction, planning and evaluation. For example, we
assigned different tasks and work around the group in order to cope with the
quantity of work demanded. This was a useful technique in co-ordination because
a we each had a Gmail account, we could all access the blog and posts we did would
be titled under each of our names to show clearly who was doing which pieces of
work which worked well in a strategic and team based formulae.
TO carry out audience
research we used Survey Monkey to help decipher what our target audience
actually wanted to see in our production and was also helpful in portraying a
vivid image of genre conventions and themes and work associated with our
particular genre. This was most useful because, although we already had quite a
good understanding of the UK hip-hop artist Loyle Carner, we managed to get
many responses which altered and adapted our understanding of the British
rapper’s meta-narrative. For example, a large percentage of our target audience
interpreting Loyle Carners song –Mufasa of having perhaps a more solemn and
sombre representation, whereas we had previously determined it as a happy song.
Once we looked into the lyrics and meaning of these we in fact became more
agreed on the opinion that the song did in fact hold a more reserved and
saddening undertone to which we had first missed. SurveyMonkey was helpful in
determining this because it filed the information’s quickly and easily into
graphs which were easily read and organized to give an accurate and visual
representation of our target audiences interests and beliefs. This therefore
had an impact on our planning and construction as we had to begin re working
and re thinking our concept due to the realised mood of the song, SurveyMonkey
was helpful in doing this, however, as it helped us come to the realisation
that perhaps our initial ideas were not fully accurate and the feedback the
survey site enabled us to retain was helpful in giving us that second opinion
that in hindsight we did need.
This is an example of a use how we Web 2.0 allowed us to
really pick out a target audience and then attempt to penetrate the audience by
creating an audience portfolio of what we would expect them to like. We were
enabled to do this by using email to send our questionnaire of which we
produced on SuveyMonkey to variety of different demographics and psychographics
to gain an all rounded representation of the artists perceived metanarrative.
We found the use of Web 2.0 a large part of the planning and research angle of
our production, as for us, the internet was a big part of how we were initially
introduced to the artist and therefore we knew that there was much more that
web 2.0 could offer us in terms of understanding the artist had to offer. This
was true as we researched the artists past and life, to which we established
his Father had died when he was very young and that this influenced the family
and united side of his music, which again we transferred into the construction
of our production where we themed our music video around losing a loved one,
which we felt the track suited very well.
Using DaVinci
Resolve, we constructed an animatic by physically drawing all the stages of
scenes and angles of shots we wanted to use. We created about 30 individual
frames and then used a camera to film the length of each shot, with this we
tried to be relatively accurate as we knew it would benefit us in the
construction of the film as it would mean we would have a more thorough and
insightful idea of how much footage we have and need. After we had this clip,
we arranged the frame in the order we wanted them to be in and shot them on a
camera, this was helpful as it essentially created a real and physical form of
our music video which enabled us to watch the video back with the music and
decide if there were any obvious parts which didn’t fit or if there were any
obvious parts which we needed to get, it also helped us decide the anchor
points of the video as such. Placing the animatic with the music it made it
clear which aspects of the song would be the climax’s and therefore we would
need to align these with correspondingly strong visuals.
When shooting we used
a HD camera, a multitude of equipment like the track and dolly and the Jib to
exhibit professional looking footage through a variety of tried and tested
camera techniques.
Sunday, 27 November 2016
LH: Progress Update

Friday, 25 November 2016
Group: Rough Cut 2
Group: Advert mock up

We are going to take a similar editing stance to the digipack, by making it disjunctive through the use distorting the image. This will link all of our print work pieces together allowing the reader to create links between them.
As well as the image and the distortion we will incorporate text. to show how it is a teaser for the upcoming album of Loyle Carner. We have to take into account that the song of our choice is not on an album, this means we will have to make one up and create a brand new digipack and advertisement scheme.
JB: Progress Update 25/11/2016

In the last few lessons, despite unforeseen disruptions, I am making progress on the Digipak, the front cover is finished in a polarized and layers fashion, and the double page spread of the inside of the Digipak is moving foward. Again, using the theme of layering and polarization to create a harsh feel of reality as such, implies that the characters past is vivid but blurred at the same time. This is also represented by the unlogical nature of the photograph as the photograph is essentially the teenage version of the boy looking back on his past memories of his father and himself, in child form, which links into Dyers theory of the paradox's which relate the realism and inrealistic parts of the image.
Group- Analysis of Digipak
The distorted image on the front of the digipak is there to create an enigma for the audience with it being blurred the intent of the image is unclear. On the back of the digipak is the back of a head, by this we are trying to connote that when you open the digipak you are entering the mind of the artist but with their being distorted images this tells the audience that his mind is jumbled and a mess.
Inside the digipak there is an image that where by the artist is looking over his Dad and a younger self, which connotes him looking over his memories. The image is polarized to give a harsh reality that his memories are distant and vivid. So with this digipak you are entering a mind that is hurt by his past.

Inside the digipak there is an image that where by the artist is looking over his Dad and a younger self, which connotes him looking over his memories. The image is polarized to give a harsh reality that his memories are distant and vivid. So with this digipak you are entering a mind that is hurt by his past.

O.C-Progress Update
During this week I have been working on the print work. More specifically I have been working on the digipak starting to form the final piece. I have started to distort the image to gain to make the image unclear aim, an enigma is the result of the distorted image by which the audience then pays more attention as they try to form an understanding of it. The image can be interpreted in a number of ways with there been no right or wrong answer.
Also I experimented with the text, I was trying to think what fitted the conventions of our music genre. The font size in proportion the digipak was something that was thought through. Where the text is placed on the front of the digipak is important also as it has to be positioned.

Also I experimented with the text, I was trying to think what fitted the conventions of our music genre. The font size in proportion the digipak was something that was thought through. Where the text is placed on the front of the digipak is important also as it has to be positioned.
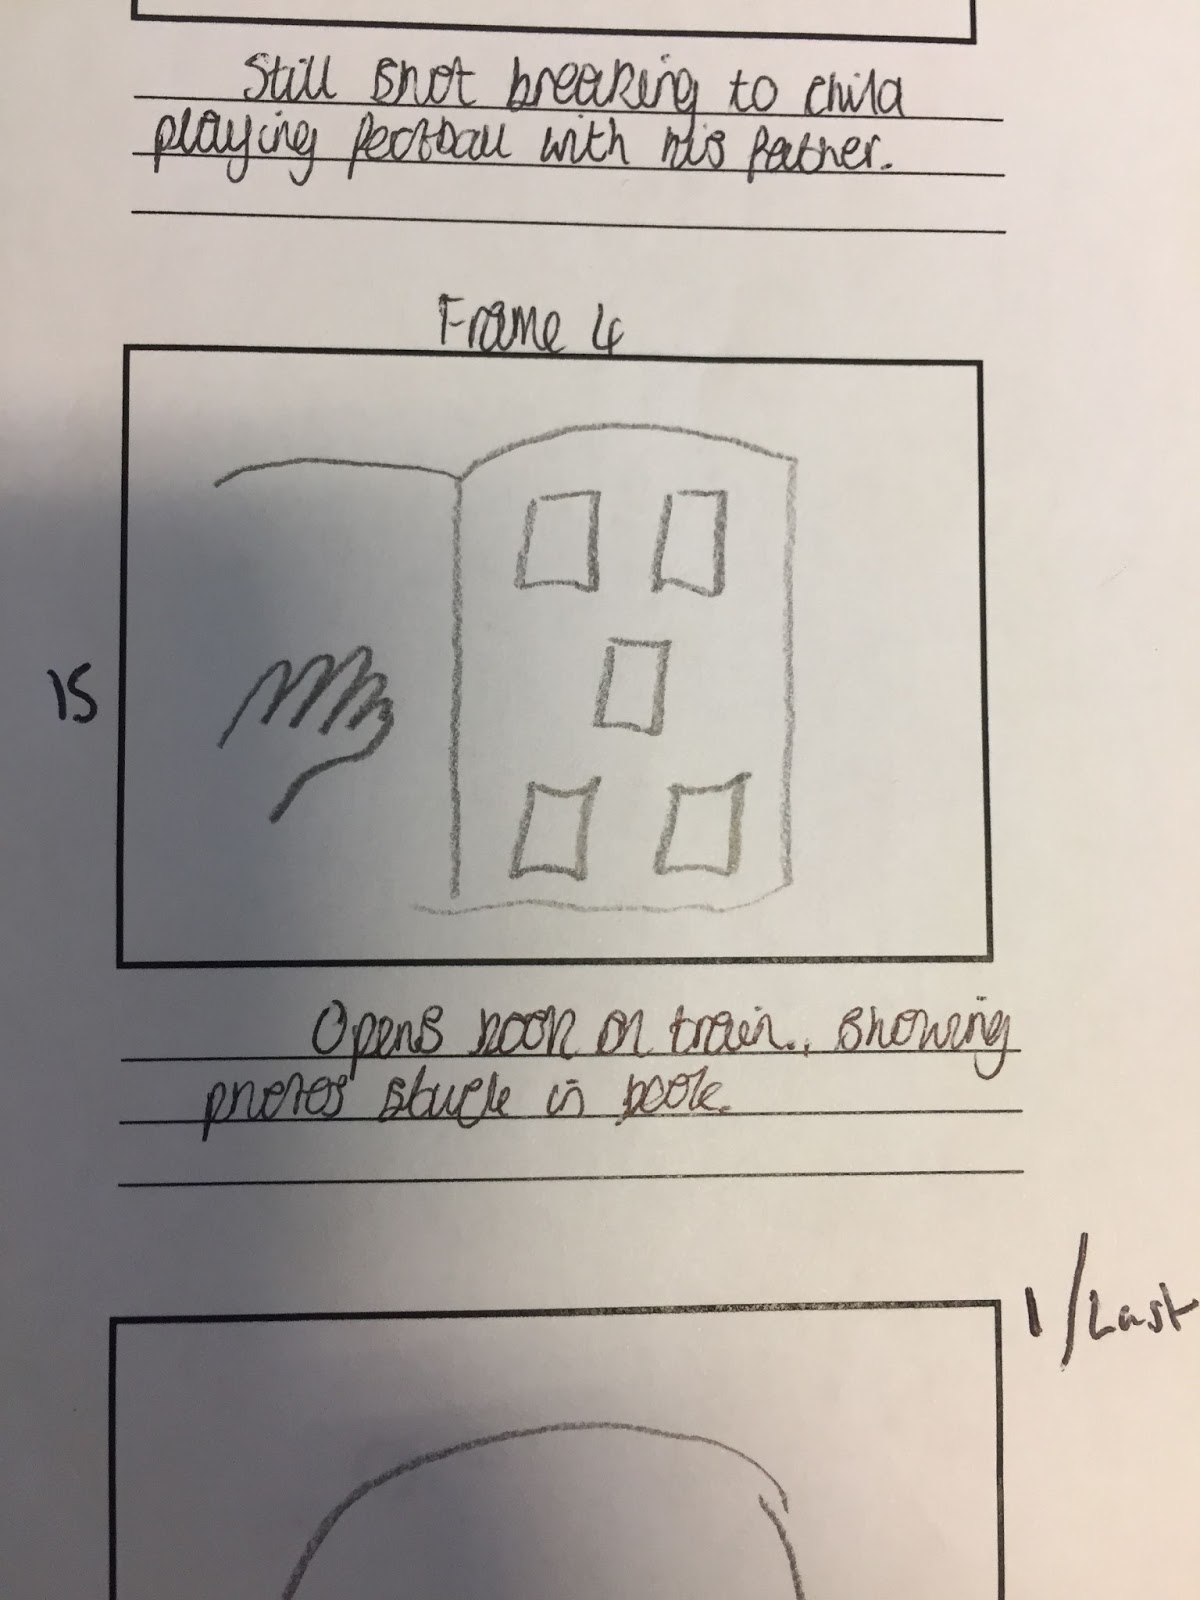
O.C.Storyboarding Task
Our idea is that we access another line of action through pictures in a book that when opened, this accesses another line of action in our music video which is very unconventional of a traditional film with this being the genre of sci-fi fantasy. The use of special effects enables us to do this, it enables us to form the narrative of the music video also.

The continued use of close-ups in the music video is something that does not conform to traditional film making also, with direct eye line match to the camera forms a connection with the audience something which does not occur as frequently in traditional film making.

The faster cutting rate of the music video is also something with rejects norms of traditional film making. Although it does occur in films there is a mix of both fast and slow cutting rates in a film this contrasts a music video where the cutting rate is constant.

Lip syncing is something that is very conventional to music videos and especially Hip-Hop, but this type of performing is very rarely used in filming as there is a direct connection with audience something which is not always wanted in a film as they follow the narrative opposed to the actual person.

Another technique that we are going to use is montage editing, we want to emphasise that time is moving and the person in the shot is dwelling on time. Although montage editing is used in filming the fast cutting rate as well as being in time with the music is unconventional of traditional filming.

Another method used that challenges the conventions of traditional film making is changing the opacity of two images and placing them at the same time on the editing timeline just one above the other. This emphasises the point we are trying to make in the music video about it being abstract and calming.

Thursday, 24 November 2016
LH: Storyboarding Music Videos

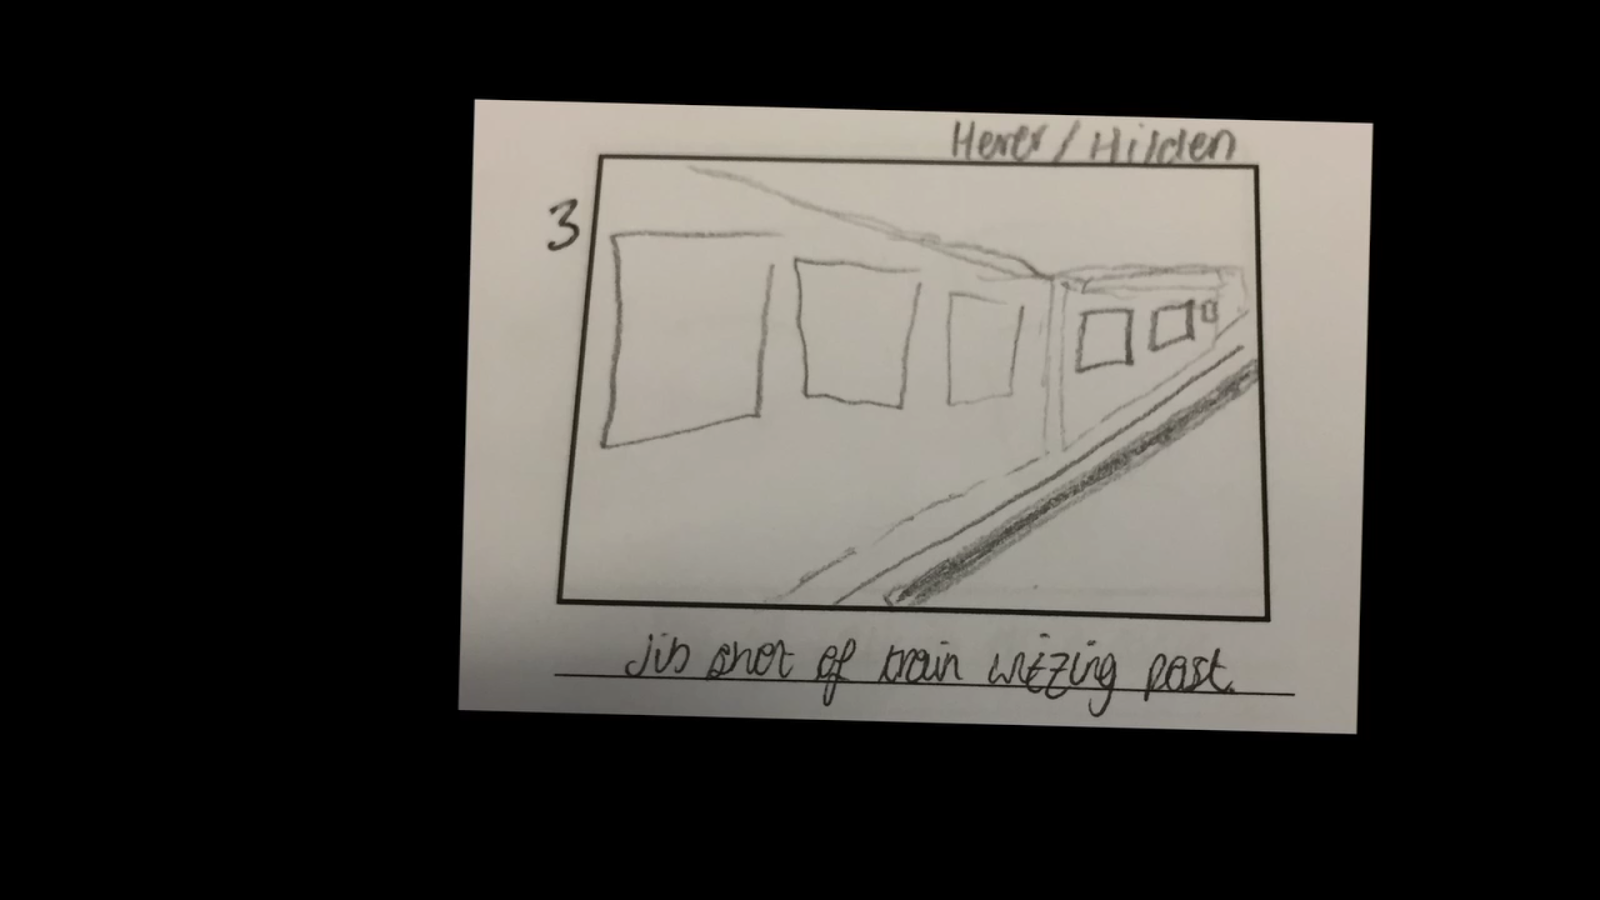
The first method we have is camera equipment like the jib. It has enabled us to keep slow moving shots looking fluid and not bumpy, this is a clever use as creates slow movement for the camera making it look professional, another method that can be used to gain similar movement in shots is through the track and dolly.

Another method was within the editing process, we can see above that there are two images composited onto one and other. This is done through changing the opacity of the clips and placing them at the same point (one above the other) on the editing timeline. This works effectively in our piece as it gives off a dreamy feel which links closely to the track.

This image above shows two methods of unconventional film-making, which could be described as more postmodern. I will begin with the factor of breaking the fourth wall, This is where the character in the shot looks directly through the lens of the camera. This is particularly unconventional of film-making, as it is commonly known that when making videos eye line should be diverted away from the camera to pretend it is not there, this rule is broken in order to connect with the audience in a music video, therefore making it effective in our case.
Also, in this shot we can see the use of a pull focus which is a method done while filming rather than in the editing process. This shot changes from a period of out of focus to going into a more in focus shot in a matter of seconds. This is not a conventional way of shooting, and it is rare in traditional film to see this technique used particularly frequently.

Another method that we used in our shoot which is not conventional of traditional film is the use of lip-syncing. It allows the performer to connect with the audience by reciting the lyrics in time with the song, and then it is placed on the correct position on the timeline, this is vital to make sure it is correct with the music. This is not conventional in traditional film and is only ever used in music videos of the post-modern era.

In our clip we decided to use a montage sequence this allows us to go through many shots in a very quick succession. Music videos are of postmodern form, this means that many of the traditional film making techniques are adapted. We have done this in our case through not using the normal method of continuity editing, in fact we steered clear from this through editing with a more disjunctive technique and montage techniques.
Sunday, 20 November 2016
LH: Progress update

In today's lesson we reviewed the editing sequence on After Effects, and discussed as a group the most effective way to incorporate it within our timeline overall. We decided that the best way to do it is to cut it up into a more montage sequence seeming a little disjunctive where other shots i.e. that of lip syncing or train/graveyard shots. This adds more effect as well as prolonging this sequence as it is the most substantial in terms of editing process. Once this is complete we will be able to add it on the main timeline, this will enable us to gain a complete rough cut of the video from start to finish. One target that we have set as a group is for all footage to be on the timeline by Friday the 25th giving us time once this is done to add effects like colour grading and transitions.
Wednesday, 16 November 2016
JB: Progress Update 16/11/2016
Throughout today, I spent time trying to perfect the more laborious tasks of making the videos play at the right time and I began to play about with the movements of the performance.
To select the correct part of the clip to be shown, you had to
To select the correct part of the clip to be shown, you had to
- Right click on the clip the folder of the clip belonged to and change the composition settings to 100 frames instead of the standard 27, to show the whole of the clip.
- Right click on the file itself and go to Time, to where you can re-amend the time on the clip.
- Stretch the clip out to 750 frames to enable time for all the clips to play accounting for time for the transitions to move between one another.
- Then by selecting a new toggle, select the part of the clip I wanted to show on the timeline which was usually around 2/3 seconds.
- Amend a time gap of around 1 second inbetween clips for the transition to take place.
LH: Transition ideas

Group: reflection on shoot 4

On Sunday the 13th we began shooting the lip-syncing sequence of our video, we decided on two locations one of a rural and the other being urban. It was a more difficult shoot as it had to be in time with the backing music which took plenty of attempts, but overall the shots we got will work well on our sequence. From this shoot we have come to the conclusion that we may need to get some more lip-syncing, that could be used as fillers, they are quite effective overall. We can get these shots at the end once the rest of the timeline is complete and add them in after the rest of the timeline is complete.
LH: Progress Update

Today we began putting the the lip-syncing shots that we gained at the weekend onto the timeline. This was a more challenging task as it was difficult to get the timing to perfection. The shots we gained at the weekend were effective especially between the two separate locations. Getting it in time with the song in the editing process is difficult and takes a substantial amount of trial and error. It has also meant that there are now more gaps in the sequence between the shots we have already put in, this will make the editing process more difficult in the future as it means we will be filling in the gaps rather than editing in chronological order.
O.C-Progress Update
On the weekend we experimented with lip syncing as we all agreed that there will be gaps in the music video that would need to be filled. Also as there were only two previously locations that we filmed at it would be a more interesting watch if there was a greater variety of locations.
After we gained the lip syncing footage we put it all on the timeline cutting and editing parts so it was in time with the music. We found that some parts were successful. But to gain a higher band mark we conversed that more movement in the lip syncing shot were needed. For example we though a good shot would be a backwards track as I walked slowly towards whilst lip syncing.

Tuesday, 15 November 2016
JB: Progress Update 14/11/2016
Since filming once again at the weekend we have been able to really add a new level of distinction to the meta narrative of Loyle Carner and have been able to display an understanding of technical aspects including the relationship between lyrics and video to make it clear the narrative of the video, a relationship described essential by Dyer.
Also in terms of after effects I have now made the decision to edit in After Effects as opposed to Fusion 8.1. I had to overcome many obstacles such as with tracking the points of each side of the box. Due to the fact the initial shot was filmed on a train, the shot wasn't very steady which made tracking the points very complex and difficult to do. Instead, on After Effects, I have taken a high resolution photograph of the same boxes instead off using the video, this has therefore reduced the astigmatism of the instability on the camera completely obviously because the image doesn't move anymore. This has made it easier to corner pin the photographs to the boxes and has overall made it look much more professional as it is more clear and less 'fuzzy'. In terms of making the process look realistic and real. I have added a zoom in varying speeds throughout the process to make the jump look interfered with almost, such as it would be on a train. In addition to this, I have also added a wiggle to connote the fact the camera is handheld and is dealing with turbulents of the trains journey helping to make the segment appeal more pragmatic and logical.
Also in terms of after effects I have now made the decision to edit in After Effects as opposed to Fusion 8.1. I had to overcome many obstacles such as with tracking the points of each side of the box. Due to the fact the initial shot was filmed on a train, the shot wasn't very steady which made tracking the points very complex and difficult to do. Instead, on After Effects, I have taken a high resolution photograph of the same boxes instead off using the video, this has therefore reduced the astigmatism of the instability on the camera completely obviously because the image doesn't move anymore. This has made it easier to corner pin the photographs to the boxes and has overall made it look much more professional as it is more clear and less 'fuzzy'. In terms of making the process look realistic and real. I have added a zoom in varying speeds throughout the process to make the jump look interfered with almost, such as it would be on a train. In addition to this, I have also added a wiggle to connote the fact the camera is handheld and is dealing with turbulents of the trains journey helping to make the segment appeal more pragmatic and logical.
Friday, 11 November 2016
JB: Progress update 11/11/16
In today's lesson we had to produce a rough cut by the hour of 10:00 of which was a great challenge and we had to cut corners, such as some clips being colour graded and some not, and many clips uneditted in order to assure all the footage was on the timeline, although it wasn't in the nearest of order nor had we really gone into depth of editing the new footage as we were very short on time!
However, from this experience we have realized that compared to some groups we may be a bit behind in terms of how many clips we had on the timeline. This has been helpful nonetheless though because I think it has helped us realize that it is more important to get the clips actually on the timeline as opposed to editing the few clips that are currently there.
However, from this experience we have realized that compared to some groups we may be a bit behind in terms of how many clips we had on the timeline. This has been helpful nonetheless though because I think it has helped us realize that it is more important to get the clips actually on the timeline as opposed to editing the few clips that are currently there.
O.C-Progress Update
I finished exported the animatic and explained where there were gaps in the music video. I thought that they could be filled easily by lip syncing and then using them as filler shots. The variety of different shots therefore coming from the lip syncing gives a greater balance as there are more types of shots and also other locations.
Later on in the week I helped put shots on the timeline where we made a rough cut, although not perfect it was put into chronological order with a clear narrative now evident. Some shots on the rough cut were left to long this was because we didn't have enough time to cut to precise points. With more time shots will be cut to the right length giving the music video a better understanding, with also deeper meaning with the relation between lyrics and visuals much clearer.
LH: Progress Update

In today's lesson we had to have a rough cut by the end of it, this meant we were rushed to complete a mock copy with a tight time schedule. Our aim was to get as many shots as possible on to the timeline, in the rough order. As we have not got all of our shots yet it was difficult to get it in an understandable order and make it work effectively. We worked together collectively and discussed where each shot should go, obviously we had to take into account that our end product will be better than this and contain more shots.
Thursday, 10 November 2016
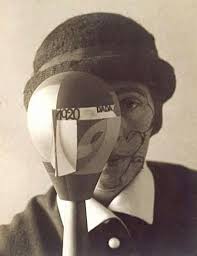
LH: Print Inspiration
Man Ray
As it can be seen in the image above a similar effect to our digipack mock up, similarities can easily be spotted for example the black and white colourway works closely with our ideas. Also, we can see the vertical design put onto the image are very similar to our design, it distorts the image cutting it up for a detached look overall.
Dada Movement
This movement as a whole connects very strongly to our printwork, it formed during the First World War in Zurich in negative reaction to the horrors and folly of the war. Commonly it is done in black and white to connote the effects that war had on the artist which is obviously a very negative position. The artists aims were to destroy traditional values in art and to create a new art to replace the old, which made it seem particularly outlandish and individual.
 |
| Man Ray - Self Portrait |
Dada Movement
This movement as a whole connects very strongly to our printwork, it formed during the First World War in Zurich in negative reaction to the horrors and folly of the war. Commonly it is done in black and white to connote the effects that war had on the artist which is obviously a very negative position. The artists aims were to destroy traditional values in art and to create a new art to replace the old, which made it seem particularly outlandish and individual.
 |
| Sophie Taeuber Arp - Dada Head |
He was an American visual artist, who contributed greatly to both the Dada and Surrealist movements, but often worked more disjunctively. Photographs were his primary source of media which he developed into abstract designs with his editing design. After living in both Hollywood and Paris he gained experience fitting with European and American audiences as well as staying clear of norms in the art world, which therefore set him apart from many artists of his time (1890-1976) which also meant he was particularly ahead of his time. The way that we took inspiration from this was in many of his edited photos is due to the distortion effect he puts on many of his pieces of art, it links closely to the J Dilla - Dillatroit as he actually used similar editing techniques. This would work well with our Digipack as it fits closely with the genre stereotypes of hip hop and in this case old school hip hop which is closely linked to Loyle Carner due to his own inspirations like Slum Village. Many of Man Ray's photos used were portraits being his speciality, this works closely with our digipack design were it contains a close up image of Oli's face which links to the portraits of Man Ray.
This image above is a prime example of the Dada movement it shows the clever usage of dis-junction, there is a lot of meaning behind this piece bringing in her perspective of the first World War. I would look at this particular piece of art with lots of inspiration, the black and white effect works well linking it to our work. Also, the facial close up seems very effective which is very similar to our front cover of the digipack ideas.JB: Progress 10/11/16
Since filming at the weekend we came across many limitations as well as advantages. Advantages include the fact that, filming of the montage part is now complete. This means we can again continue to edit the final production as we can now place and understand which parts we will situate in which parts of the video and can work around this factor as I continue to edit the montages in after effects. Also we believe these father/sons scene give a more definite and clearer meaning as to what the video is actually about. We also took the images for the print work so can now really excel the print work and digipak creations.
Despite this progress we have still had drawbacks. For editing of the montages of the montages I have needed to take considerable time in reminding myself of how to use the appropriate techniques and it took a lot of trial and error to finally remember how to create the tracking technique on Fusion 8.1. While editing of the animatic is complete and practice of lip syncing editing is now thoroughly underway we believe we can now turn to focus almost mainly on the editing of the final production of the music video. This is a good point in the campaign to take a second to stop and regroup as we feel the planning part of the production is all but complete and now we turn our focus towards the after effects and editing of the feature. We are happy with how time allocation has panned out, as we all have different and contrasting opinions in how to edit specific parts of the video, for example the title sequence, where I wanted to have the text begin to move as the vinyl moved and Leo wanted the text to stay still. We have realized that editing is a team task and cannot be done through one mindset, we need to be open-minded and weary of the others ideas which is going to be challenging but hopefully will result in a broader and more cyclical finished production.


Despite this progress we have still had drawbacks. For editing of the montages of the montages I have needed to take considerable time in reminding myself of how to use the appropriate techniques and it took a lot of trial and error to finally remember how to create the tracking technique on Fusion 8.1. While editing of the animatic is complete and practice of lip syncing editing is now thoroughly underway we believe we can now turn to focus almost mainly on the editing of the final production of the music video. This is a good point in the campaign to take a second to stop and regroup as we feel the planning part of the production is all but complete and now we turn our focus towards the after effects and editing of the feature. We are happy with how time allocation has panned out, as we all have different and contrasting opinions in how to edit specific parts of the video, for example the title sequence, where I wanted to have the text begin to move as the vinyl moved and Leo wanted the text to stay still. We have realized that editing is a team task and cannot be done through one mindset, we need to be open-minded and weary of the others ideas which is going to be challenging but hopefully will result in a broader and more cyclical finished production.
JB: Inspiration for Printwork
David Hockney
We took inspiration from various influential periods of modernistic and post-modern artistic history to help with the creation of the disjointed and puzzled effect for the print work. We have already created the front cover of the digipak with a 'dillajoint' design accomplished on Photoshop by using multitudes of layers and by disrupting the original format of such profiles and tweaking them somewhat in an attempt to create a layered and disorientated design.
Although we took inspiration from artists with conventionally similar meta-narratives as Loyle Carner, such as the 80's HipHop artists J Dilla and Slum Village, we also looked into the history of this modern artistic technique.
One inspirational character we looked at for this was David Hockney and the pieces of art he produced about his mother. We found this theme very close to home and relatable as well as surprisingly in line with Loyle Carners' familistic and home-centered music.
 |
| This particular Hockney photograph illustrates his mother in perhaps a more maternal and natural role as she breaks the familiar fourth wall creating the stereotypical loving and expressive 'motherly' role, which is used often in Loyle Carners music. |
 |
| Again this photograph appears to be taken on a day out between Hockney and his mother, expressing compassion, love and sentiment.
The main obstacle Hockney thinks he has overcome is the limited perspective of a stationary camera. A single photograph can only show one point of view, usually for a small period of time. “All photographs share the same flaw,” he says. “Lack of time.” He then goes on to trace photography’s misguided view back hundreds of years to the Renaissance and invention of the Camera Obscura.
Höch Another artist we looked at and took great inspiration from was the War time imperialist, Hannah Hoch, who took refuge from the devastation of war by creating artistic masterpieces. Hoch's most famous work, effortlessly titled 'Cut with the Dada Kitchen Knife through the Last Weimar Beer-Belly Cultural Epoch in Germany', shows her ideals and techniques in synthesis. A collage of newspaper clippings, the work challenges the racist and sexist codes upholding Weimar Germany. Throughout her career, Hoch would challenge the marginalized place of women in 20th century Germany. She drew together fashion magazines, illustrated journals and photography to pioneer a form bent on demonstrating that art itself could be collected from everyday clutter of modern life.  |
Tuesday, 8 November 2016
Group: Reflection on third shoot

- In this shoot we began to look at the flashback sequence, this meant that we had to bring in a young character who was a family friend of one of our team members. We had to do shots that seem as if they are photos coming to life, where they will begin as a static screen and begin to move as the shot develops making it seem as if the character is looking into his past.
- Also on this shoot we took some photos for our printwork, the particular shot we were aiming to get was for the inside of our digipack as it is opened up. The shot we got has a similar sort of effect as the music video, showing a someone to be looking over their past.
- One issue we had was with the camera equipment, there was an amount of confusion with what kit we took out of the school, which ultimately led to lack of a tripod meaning all of the shots we got on this day were handheld. We did not consider this to be too much of an issue and after reviewing the footage we concluded that it is usable and gives a more handheld look overall which was the effect we were aiming to go towards.
- Time management was something we had to take into account, this was because the characters we used in this shoot were on a relatively strict time schedule allowing them minimal time on shoot, which made it more rushed but the footage does not show the rushed atmosphere while shooting.
- Overall looking back over our footage we are particularly pleased with what we got, taking into consideration the issues that we came across while shooting.
Monday, 7 November 2016
Group-Reflection On 2nd Shoot
On our second shoot the outcome was a positive one, we
filmed a variety of shots that were planned with the storyboards but then also
improvised on the day and filmed more shots further. In this half of the video
we used the rural location which was set in the graveyard.
On Shoot:
- We used a variety of different JIB shots giving us a variety of different ones which we can now implement into are video.
- We trialed the lip syncing.
- A number of different camera angles were used as well as different shots such as close-up and mid-shots.
- We filmed me sitting down in a variety of different positions giving us an opportunity to montage edit.
From the shoot established
- We need more shots of the lip syncing are needed to fill the music video giving it an alternative look to the music video.
- A third location of the lip syncing may be relevant.
Friday, 4 November 2016
Group-Reflection on First Shoot
- In the filming we experimented with various jib shots from different angles for example on the top of the car park and the top of the tunnel.
- We moved onto the platform of the train station where forward tracking shots and the use of the Steadicam were seen.
- On the train close-ups and mid-shots of my face were used.
- A POV shot of me walking down the carriage on the train was something we also experimented with.
Group-Animatic
The animatic helped us form an asynchronous order in the music video. It also helped us put into perspective the 3 lines of action and how we could intercutt them and if the narrative made sense if it was put in this order. Narrative fuzz is clarified though the the 3 lines of action. The animatic allowed us to make technical decisions before the shots were taken, which allowed us to plan ahead with the filming of our shot more efficient as a result. For instance the close-up of the vinyl and the jib shot at the graveyard were well thought out before we actually filmed. We found out that the amount of shots we had was not enough so we all decided that we would implement performance into the video with lip syncing.
What was challenging with the animatic was the cutting rate and the amount of shots needed to fill the whole song. The amount of shots made this unrealistic so we stretched each photo so it lasted the whole song. So maybe the song was not as accurate as possible when matching visuals to lyrics.
Last year with the film opening the animatic was much easier as continuity was evident with also the cutting rate being slower this meant that less shots were needed. With a music video their are so many lines of action as well as no continuity.
The process of producing the animatic was first of all story boarding the frames, we took photos then of the animatic putting them into the right order. The photos were then cropped and cut using Da Vinci resolve. On the same software they were synced to the timeline were they were put into order
Group: Editing Progress
After the first lessons editing we are pleased with how well it is going so far. However, we understand there is still significant room for improvement and we have also become aware that a re-shoot may be necessary for the desired quality of footage.
Some of the features we like about our music video so far are the starting establishing shots, we believe this sets the scene well for the rest of our video and we think these are some of our best shots. we think it is best to use these in the opening of our video because it creates an attraction into watching the rest of video. We have a good range of shots of jib and tracking shots which also add a variety of shots to our opening 30 seconds.
However, there are also a range of improvements and challenges we have come across. As we are filming the photo montage part this weekend, we can't progress too far into the film as we need to allow space and room for the montage part and if we edit too much then when we insert the new footage it will distort the whole video.
We have found using the songs climaxs and sound waves to help us place the clips correctly and cut the footage to precise points on the timeline. This has been helpful when we increased the cutting rate because we can razor cut the footage on each beat.
Wednesday, 2 November 2016
JB: Lesson Review
In this and the past lesson, I have been working on planning for the animatic, planning for print production, planning for the photos montage section for the weekend and helping editing. In terms of the timeline we have been attempting to get all the clips in order so when it comes to editing we can tell which areas need improvement and which areas we may need to refilm (lip syncing parts to break up churchyard sequence).

Group: Print pitch
- We are going to create a half page spread for the NME magazine, which is a British company supplying a free magazine for those who enjoy music and entertainment. It contains high levels of content about alternative and up and coming artists which we believe to suite Loyle Carner. In fact he has featured in this magazine, where he is interviewed and given an opportunity to discuss his inspirations and upbringing showing how he got to where he is today.
- NME offer a selection of pages throughout the magazine specifically assigned to advertisement, it offers adverts ranging from quarter page to the more irregular two page spread. We came to the conclusion that due to the size of this artist and lack of recognition it would be far more realistic to see Print work of Loyle Carner taking up a half page rather than the full two pages which is more likely to be given to the wealthier and larger artists.
- It is a very popular magazine after recently becoming free in 2015 it prints 300 000 copies each week which is very useful as it gives a very broad audience to which will be viewing our print work, therefore working as a useful method of advertising.
- For our print work we have looked at similar artists as inspiration and we have liked print where it comes across as both abstract as well as having a link to the artist. For example looking at J Dilla's digipacks one can see his face in the centre but editing is put upon it making it seem particularly distorted giving it a more abstract feel overall.
- As well as this, we discussed the link between the print work and the music video itself and came to the conclusion that it is important to see some sort of link between them. The way that we have decided to show this is by using the same character and in similar locations that are used in the video itself, this would be effective as it establishes a link between theartist and the actor in the video who is portraying Loyle Carner in this case.

- For the rest of the print that is done on a Digipack we have decided to go with a 4 pane method where the front of the CD cover will contain a distorted image of Oli's face which represents the artist in this case, and the back cover will contain an image of the back of his head from the same angle. This is a clever design as it shows the CD to be inside the artist's head showing that it is coming from him.
- The interior of this digipack we have decided to use a panorama shot that takes up the whole of the inside spread, this will contain an over the shoulder shot of Oli looking out over a urban location that we have decided to be the car park in Tunbridge Wells which we used in our video shoot and felt it was a useful location as it is high up connoting power.


O.C-Progress Update
I took upon the role of the animatic. With this I took photos of the storyboards where I then uploaded them to the Da Vinci Resolve timeline. I am currently editing the pictures into order, trying to place them in time with the music also. From the animatic we will gain a better understanding of the narrative structure and if there is the need to include performance based roles in the video such as lip-syncing . The animatic also helps us form a connection between lyrics and visuals. The animatic is beneficial as we are presenting are ideas and from that forming a narrative, which then also shows potential gaps in our video, with these the areas we need to then think about.
JB: Pre-planning for shoot for Flashback moments
At the weekend, I am planning to record the 'flashback' montage moments as these are the last needed part of our footage. For this part of the filming I understand there are numerous variables I am going to need:


- A Father figure to act as the long lost father of the main character. (My dad)
- A youthful and energetic character to connote a happy young son. (Archie, 11)
- A track and dolly - for the track forwards on the sofa.
- A camera - which I will need to hire from school by Friday.
- Relatively good weather - to connote a happy and pleasant atmosphere.
We are planning on using 5 main photographs which will in turn come to life and represent the child and father having a good time playing with each other in various different locations.
I will use 'Fusion 8.1' to compliment after effects by making the images seem to come to life on a piece of paper, to connote that the main character is 'reminiscing about the old times' when his father was alive. (See 'JB: Experimentation of after effects' for evidence). I feel i will be able to create verisimilitude between the audience and the characters past by connecting these images and portraying a desirable and happy family atmosphere. I am also thinking about adding another frame to this montage to definitely make it 100% clear what is happening. This would be a shot in a rural location where I would have the main charterer looking at a view, with the adult and the younger child walking across the field together, to imply that he misses the old times.
Subscribe to:
Comments (Atom)